Bizi takip edin:

Microsoft Azure Schedule Start – Stop

One of the most important issues to consider when managing Azure resources is cost management. When the Azure usage report is generated, virtual machines will probably be the costliest resources. Automatically starting and stopping Azure virtual machines based on usage hours and days can save significant virtual machine costs compared to the time it is deallocated.

It should be considered whether virtual machines should be running all the time, or whether some virtual machines can be stopped in a specific program to save on operating costs.

Automation Account can be used to start the Azure virtual machines on a planned basis, and the “auto-shutdown” feature offered by Azure or Automation Account can be used to stop them. This article will explain how to start and stop Azure virtual machines on schedule using tags and PowerShell Runbook via Azure Portal.

Assigning Tags to Virtual Machines

This article will use the Azure tag feature to define virtual machines to schedule start and stop times. On the other hand, for example, a schedule can be made for all virtual machines under a certain subscription or resource group.

Using the Azure Portal to assign tags to multiple virtual machines is a fast and easy way. As shown in Picture 1, by selecting virtual machines and clicking the assign tag button, the desired tag can be easily assigned to the selected virtual machines.

Then the name and value to be assigned to the virtual machines are determined. As a value, planned opening and closing hours for virtual machines can be entered.

Creating Automation Account

To run Runbooks, an Automaiton Account and an Azure Run As account are required. While creating Automation Accuont, the “Create Azure Run As account” option should be selected as “Yes”.

Run As Account: Run As accounts in Automation Accounts provide authentication to manage resources in the Azure Resource Manager or Azure Classic Deployment model using Automation workbooks and other Automation features.

Creating Automation Account Runbook

PowerShell commands to select the virtual machines to be automated will be written into the runbook.

Then, with created Run As account and virtual machine tags, the opening and closing commands of the determined virtual machines can be written and the runbook can be published, as seen in Picture 5 and Picture 6. With the tags assigned to the virtual machines, an efficient filtering will be applied while the virtual machines are pulled.

Code Blocks

## Getting Azure Run As account information

$Connection = Get-AutomationConnection -Name ‘AzureRunAsConnection’

## Adding Azure Run As account to existing session

Add-AzureRMAccount -ServicePrincipal -Tenant $Connection.TenantID -ApplicationId $Connection.ApplicationId -CertificateThumbprint $Connection.CertificateThumbprint

## Getting Azure Run As account information

$VMs = Get-AzureRMVM | Where-Object {$_.Tags.AcilisSaati -eq ’08:00′}

## Starting Virtual Machines

$VMs | Start-AzureRMVM

## Getting Azure Run As account information

$Connection = Get-AutomationConnection -Name ‘AzureRunAsConnection’

## Adding Azure Run As account to existing session

Add-AzureRMAccount -ServicePrincipal -Tenant $Connection.TenantID -ApplicationId $Connection.ApplicationId -CertificateThumbprint $Connection.CertificateThumbprint

## Getting virtual machines with a tag value of 5pm

$VMs = Get-AzureRMVM | Where-Object {$_.Tags.KapanisSaati -eq ’17:00′}

## Deallocating Virtual Machines

$VMs | Stop-AzureRMVM -Force

Testing Runbooks

To test runbooks, before publishing, the codes can be run by clicking the Test pane button. The code result should output as an output showing that the transaction is completed without any errors. Then, when you go and look at the status of the virtual machines, it can be seen that the commands run successfully.


Schedule Runbooks

After creating the runbooks, testing their work, and publishing them on Azure, all that remains is to schedule them to run at desired times. This can be done by using the “schedule” feature of Automation Account. For this, first of all, schedule should be created according to the desired time. Then it is necessary to link the runbook published with this schedule.

Create a Schedule

A schedule can be added by clicking the schedule button under Automation Account ‘shared resources’.

Schedule can be run repeatedly at specified times by selecting the recurring option while adding a schedule.

Then the created schedules will appear in the schedule list.

Adding Schedules to Runbooks

After the schedules and runbooks are created, the remaining step is to ensure that the runbooks are connected with schedules that will enable them to run at the specified times. The desired schedule can be selected by clicking the Link to Schedule button in the overview tab of the desired runbook.

Then the desired schedule can be selected as shown below.

Things to pay attention

Automation can provide significant cost savings. However, attention should be paid to the following issues:

  • One of the tags provided with filtering should not be assigned to virtual machines that need to work 24/7.
  • Likewise, when selecting a tag, it is important to make sure that it has not been assigned to one of the critical virtual machines before.
  • It may be necessary to assign different tags, runbooks, and schedules if the connected resources need to be in a certain order as they open and close. For example, a server hosting an application and a server containing a database should be turned on and off respectively.
  • If the start button is pressed after the runbook is published, the commands written to turn on the virtual machines will be opened if the machines are turned off directly, and the commands written to turn off the virtual machines will be turned off if the machines are turned on. It is important to run runbooks under control.

Summary

This article explains how to use tags and automation account for the runbook, which enables to automate the starting and stopping of Azure virtual machines on a specific schedule. The following processes were covered step by step:

  • Assigning tags to virtual machines,
  • Assigning tags to virtual machines,
  • Creating a schedule,
  • Linking schedule and published runbooks.

Previous Post

Building a Backend Web API with Azure Functions

Next Post

What is Azure Application Security Group?

Azure kaynaklarını yönetirken dikkat edilmesi gereken en önemli hususlardan biri maliyet yönetimidir. Azure kullanım raporu oluşturulduğunda muhtemelen maliyeti en yüksek kaynaklar sanal makineler olacaktır. Azure sanal makinelerini kullanım saatlerine, günlerine göre otomatik olarak başlatmak ve durdurmak sanal makine maliyetlerinde deallocate olduğu saate göre önemli düzeyde tasarruf sağlayabilir.

Sanal makinelerin her zaman çalışır durumda olması gerekip gerekmediği veya bazı sanal makinelerin işletim maliyetinden tasarruf etmek için belirli bir programda durdurulup durdurulamayacağı değerlendirilmelidir.

Azure sanal makinelerini planlı olarak başlatmak için Automation Account’tan, durdurmak için ise Azure’un yerleşik olarak sunduğu ‘auto-shutdown’ özelliğinden veya yine Automation Account’tan faydalanılabilir. Bu makalede Azure Portal üzerinden etiketler ve PowerShell Runbook kullanılarak Azure sanal makinelerinin planlı olarak başlatılması ve durdurulması anlatılacaktır.

Sanal Makinelere Etiket Atamak

Bu makalede başlama ve durdurma zamanı planlanacak sanal makineleri tanımlamak için Azure etiket özelliğinden faydalanılacaktır. Öte yandan örneğin belirli bir subscription veya kaynak grubu altındaki tüm sanal makineler için bir planlama yapılabilir.

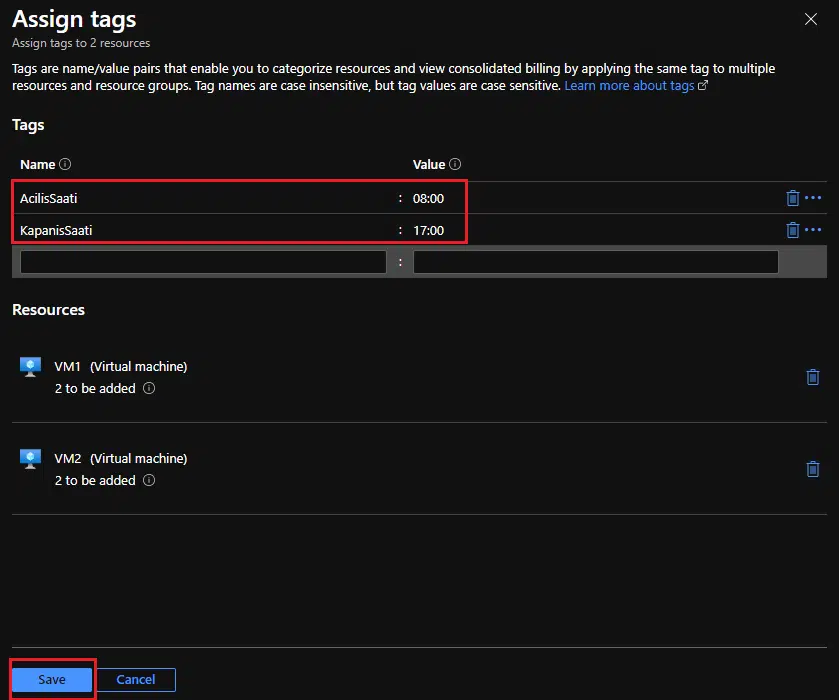
Birden çok sanal makineye etiket atamak için Azure Portal’ı kullanmak hızlı ve kolay bir yoldur. Resim 1’de görüldüğü üzere sanal makineler seçilip ve etiket ata butonuna tıklanarak, istenilen etiket seçilen sanal makinelere kolaylıkla atanabilir. 

Ardından sanal makinelere atanacak isim ve değer belirlenir. Değer olarak sanal makineler için planlanan açılış ve kapanış saatleri girilebilir.

Automation Account Oluşturmak

Runbook’ları çalıştırmak için bir Automaiton Account’a ve Azure Run As hesabına gereksinim duyulur. Automation Accuont’u oluştururken ‘Create Azure Run As account’ seçeneği ‘Yes’ olarak seçilmelidir. 

Run As Account: Azure Otomasyonundaki Run As hesapları, Otomasyon çalışma kitaplarını ve diğer Otomasyon özelliklerini kullanarak Azure Resource Manager veya Azure klasik dağıtım modelindeki kaynakları yönetmek için kimlik doğrulaması yapılmasını sağlar.

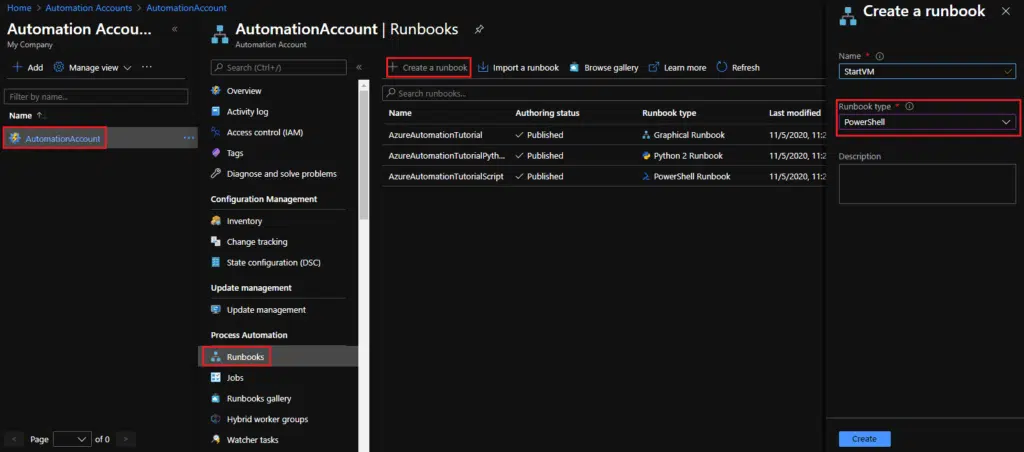
Automation Account Runbook Oluşturmak

Runbook içerisine, otomatize edilecek sanal makinelerin seçileceği PowerShell komutları yazılacaktır.

 Ardından oluşturulan Run As hesabı ve oluşturduğumuz sanal makine etiketleri ile Resim 5 ve Resim 6 da görüldüğü üzere belirlenen sanal makinelerin açılış ve kapanış komutları yazılabilir ve runbook yayınlanabilir. Sanal makinelere atanan etiketler sayesinde, sanal makinelerin çekilmesi işlemi uygulanırken verimli bir filtreleme uygulanmış olacaktır.

Kod Blokları

## Azure Run As hesabı bilgisini almak 

$Connection = Get-AutomationConnection -Name ‘AzureRunAsConnection’

## Azure Run As hesabını var olan oturuma eklemek

Add-AzureRMAccount -ServicePrincipal -Tenant $Connection.TenantID -ApplicationId $Connection.ApplicationId -CertificateThumbprint $Connection.CertificateThumbprint

## Etiket değeri 08:00 olan sanal makineleri almak

$VMs = Get-AzureRMVM | Where-Object {$_.Tags.AcilisSaati -eq ’08:00′}

## Sanal makineleri başlatmak

$VMs | Start-AzureRMVM

## Azure Run As hesabı bilgisini almak 

$Connection = Get-AutomationConnection -Name ‘AzureRunAsConnection’

## Azure Run As hesabını var olan oturuma eklemek

Add-AzureRMAccount -ServicePrincipal -Tenant $Connection.TenantID -ApplicationId $Connection.ApplicationId -CertificateThumbprint $Connection.CertificateThumbprint

## Etiket değeri 17:00 olan sanal makineleri almak

$VMs = Get-AzureRMVM | Where-Object {$_.Tags.KapanisSaati -eq ’17:00′}

## Sanal makineleri durdurmak

$VMs | Stop-AzureRMVM -Force

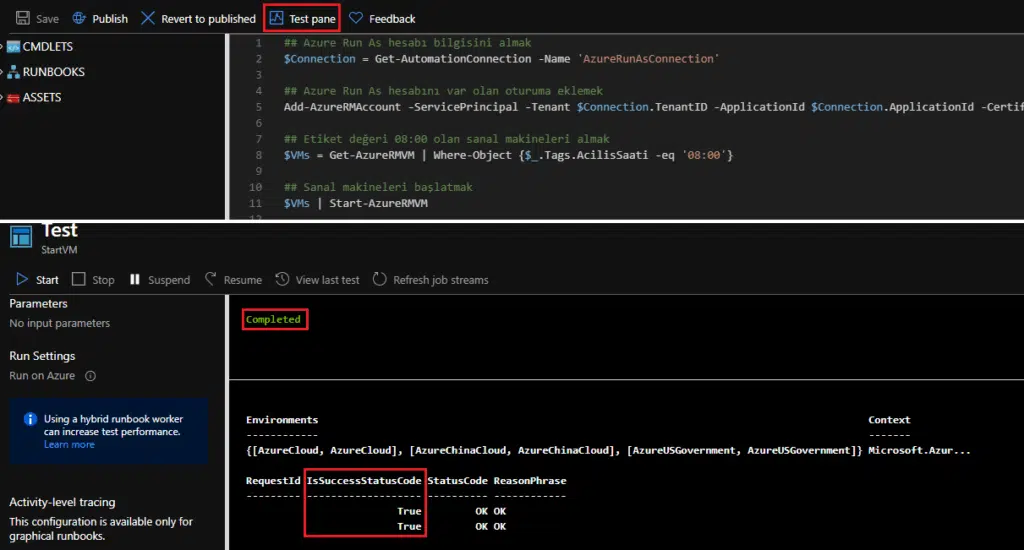
Runbook’ların Test Edilmesi

Runbook’ları test etmek için publish etmeden önce Test pane butonu tıklanarak kodlar çalıştıralabilir. Kod sonucu output olarak hiçbir hata olmadan işlemin tamamlandığını gösterir vaziyette olmalıdır. Ardından gidip sanal makinelerin durumuna bakıldığında komutların başarılı şekilde çalıştığı görülebilir.

Runbook’ların Çalışma Zamanlarını Belirleme

Runbook’ları oluşturup, çalışmalarını test edip, Azure üzerinde yayınladıktan sonra geriye onların istenilen zamanlarda çalışacak şekilde planlanması kalmaktadır. Bu da Automation Account’un ‘schedule’ özelliğini kullanarak yapılabilmektedir. Bunun için ilk önce istenilen zamana uygun schedule oluşturulmalıdır. Daha sonra bu schedule ile yayınlanmış runbook’u linklemek gerekmektedir.

Schedule Oluşturma

Automation Account ‘shared resources’ altında schedule butonu tıklanarak bir schedule eklenebilir.

Schedule eklerken recurring seçeneği seçilerek schedule’ın belirlenen zamanlarda tekrarlı olarak çalışması sağlanabilir.

Daha sonra schedule listesinde oluşturulan schedule’lar görünecektir.

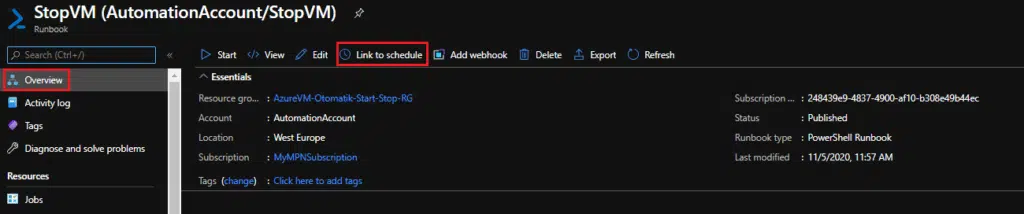
Runbook’lara Schedule Ekleme

Schedule’lar ve runbook’lar oluşturulduktan sonra geriye kalan adım runbookların belirlenen zamanlarda çalışmasını sağlayacak schedule’lar ile bağlanmasını sağlamaktır. İstenilen runbook’un overview sekmesinde bulunan Link to Schedule butonuna tıklanarak istenilen schedule seçilebilir.

Ardından aşağıda göründüğü gibi istenilen schedule seçilebilir.

Dikkat Edilmesi Gerekenler

Otomasyon maliyet olarak çok önemli bir tasarruf sağlayabilir. Ancak aşağıdaki konulara dikkat edilmelidir.

  • 7/24 çalışması gereken sanal makinelere filtreleme sağlanan etiketlerden birinin atanmaması gereklidir.
  • Aynı şekilde etiket seçerken daha önce kritik sanal makinelerden birine atanmadığından emin olmak önemlidir.
  • Bağlı kaynakların, açılıp kapanırken belli bir sırada olması gerekiyorsa farklı etiketler, runbooklar ve schedule’lar atamak gerekebilir. Örneğin; uygulama barındıran bir sunucu ile veritabanı içeren bir sunucu sırasıyla açılıp kapatılmalıdır.
  • Runbook yayınlandıktan sonra start butonuna basılırsa, sanal makineleri açmak için yazılan komutlar ise makineler direk olarak kapalıysa açılacak, sanal makineleri kapatmak için yazılan komutlar ise makineler açıksa kapanacaktır. Runbookların kontrol dahilinde çalıştırılması önemlidir.

Özet

Bu makalede, Azure sanal makinelerinin başlatılması ve durdurulmasını belirli bir zamanlamaya göre otomatikleştirmeyi sağlayan runbook için etiketlerin ve automation accountun nasıl kullanılabileceği anlatıldı. Aşağıdaki süreçler adım adım aktarıldı:

  • Sanal makinelere etiket atamak,
  • Runbook’ları oluşturmak, test etmek ve yayınlamak,
  • Schedule oluşturmak,
  • Schedule ve yayınlanan runbook’ları bağlamak.
Previous Post

Building a Backend Web API with Azure Functions

Next Post

What is Azure Application Security Group?

Start typing to see you are looking for.