Bizi takip edin:

Azure Devops

What is Azure Devops?
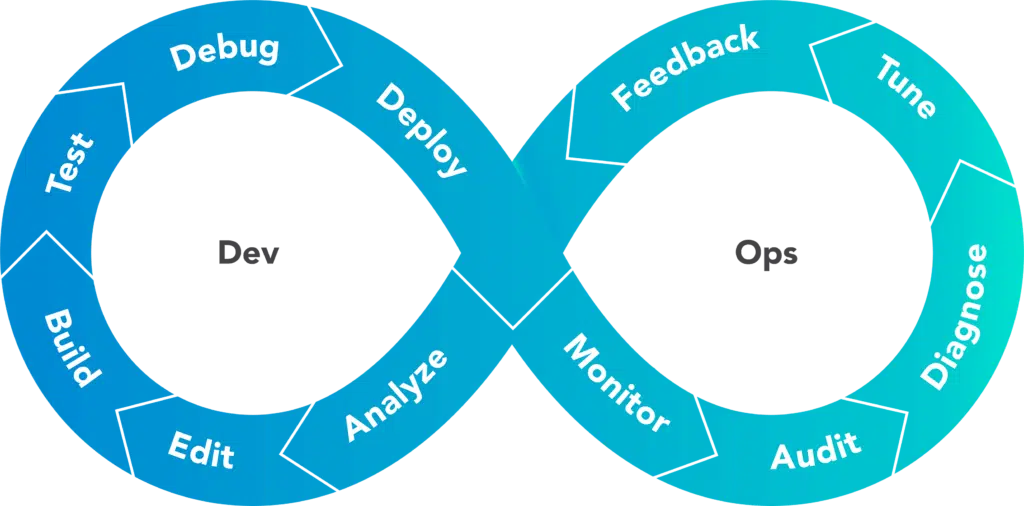
DevOps is not only a tool but also a cultural and professional movement. In my opinion, Devops are practices that provide automation, communication and integration between software teams and IT teams.

In this approach, Azure DevOps comes with 5 main modules. These are ; Boads, Repos, Pipelines, Tests and Artifacts. In fact, none of these modules are work that we haven’t done before, and it’s not a new technology, but the added value of Azure DevOps is that we can manage all project components from a single portal. All project related development steps, kanban board, code repository, automatic CI / CD processes, test steps and nuget packages can be managed through a single portal.

Azure Devops Modules
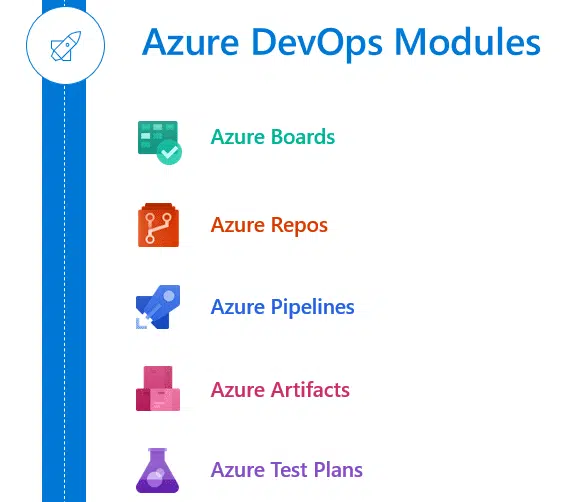
Azure Boards consists of 5 main components:

1. With Azure Boards, we can follow all the effort and steps of our project. We can follow the classical Agile, Scrum methods or customize it according to our requests.

2. With Repos, we can keep our team’s knowledge base or codes in the same environment as our project. We can host our application as a package with the VSTS feature if we want with the Git feature.

3. Azure Pipelines : Maybe we can say that Pipelines Azure DevOps is the most important feature. With this module, we can set up our CI / CD processes, set up approval mechanisms or run scripts that run automatically.

4. With the test module, we can setup test steps in our application. We can try these from a browser, open a bug detection and create work items based on these bugs.

5. With Arfitacs module, we can distribute the dependency packages used by our application. After the application is compiled, the dependencies used by the most current version are packaged and distributed in nuget or other package management languages.

Devops Lifecycle
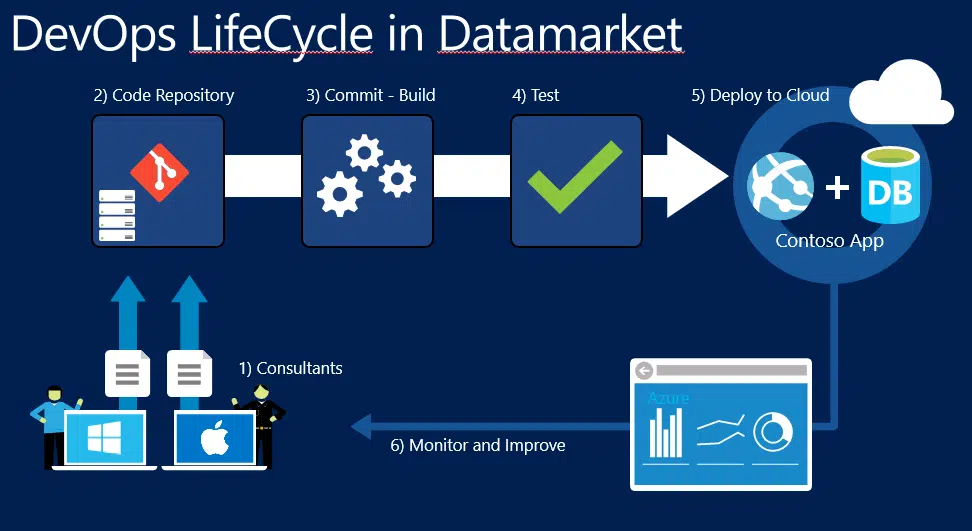
If we want to develop a project with Azure DevOps, the life cycle of this project will be as above. To explain this image

    1. Consultants & Developers : Development of the application or project is made. Pushed to the repository.
    1. Code Repository : The source codes sent by the developers are versioned and kept in the branch structure. If the development is found appropriate, a pull request is made to the master branch.
    1. Commit-Build : After the application is Pull Request, Build process is performed and the executable file is built.
    1. Test : Automated tests are performed before the executable package is deployed. If all of these tests are successful, move on to the next step.
    1. Deploy to Cloud : Our executable package is loaded into the production environment with the deployment model specified and our new version goes live.
    1. Monitor and Improve : The production environment is monitored and the process is turned back according to the business needs, and related developments are made.

Although the above life cycle shows the repetitive life cycle of DevOps in a very superficial way, it may be possible for different companies or different units to take part in each stage according to each company’s own environment. Even doing the same process with different tools and teams within the same company can often be the case. But the only thing that does not change is that each process runs automatically one after another and the life cycle is systematic, independent of individuals.

Azure Devops Pipeline Sample

If we want to set up the Azure DevOps service internally or individually. It will be enough to log in to dev.azure.com and create a project. One of the most important thing of this service is that all features up to 5 users are free within the same project and then they offer a free restricted access. Some of the projects in my devops environment are shown in the image below.
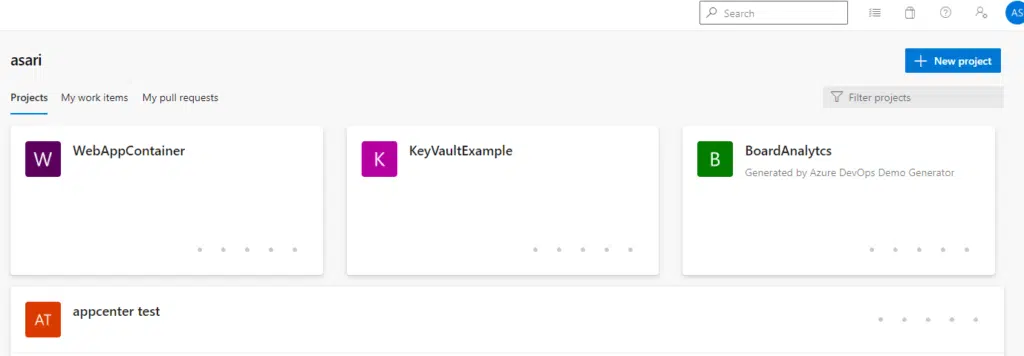
We are entering our project called WebApp Container and a welcome screen appears. Here is a general information about our project and a field that we can call wiki..
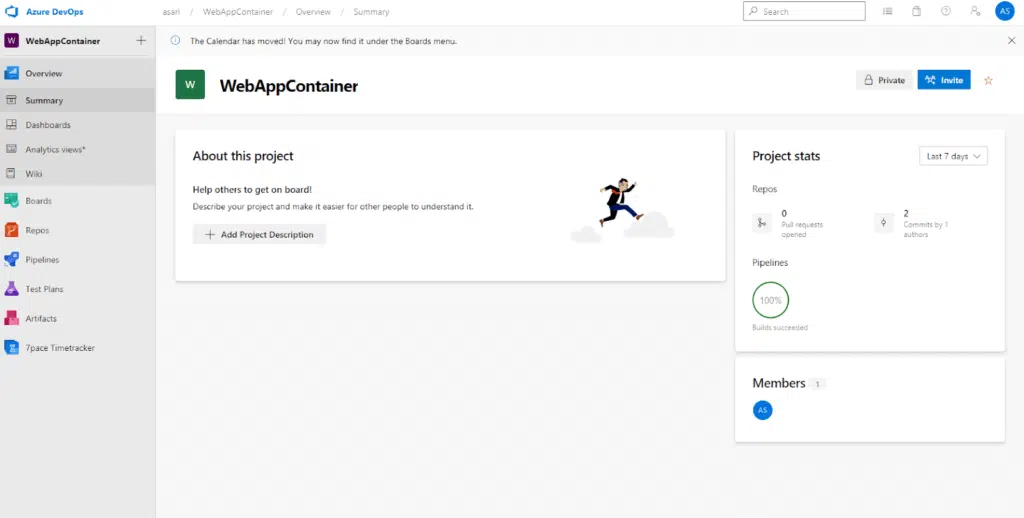
You also see another module under Artifacts on the left. You can add extensions to your project from Azure DevOps’ marketplace. We will make an example of editing a new pipeline. For this, we publish the codes to our repository first. If we wanted to, we could keep the code not here, but in any git distribution.
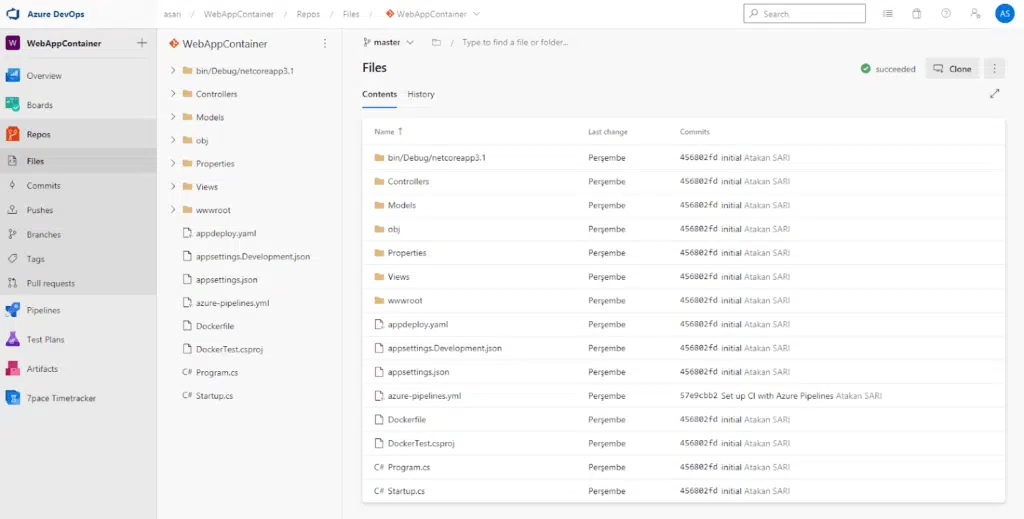
Since our codes are located in our Repository, we first construct the CI pipeline that will work with every code transmission. To do this, we press the New Pipeline button from the Pipelines module.
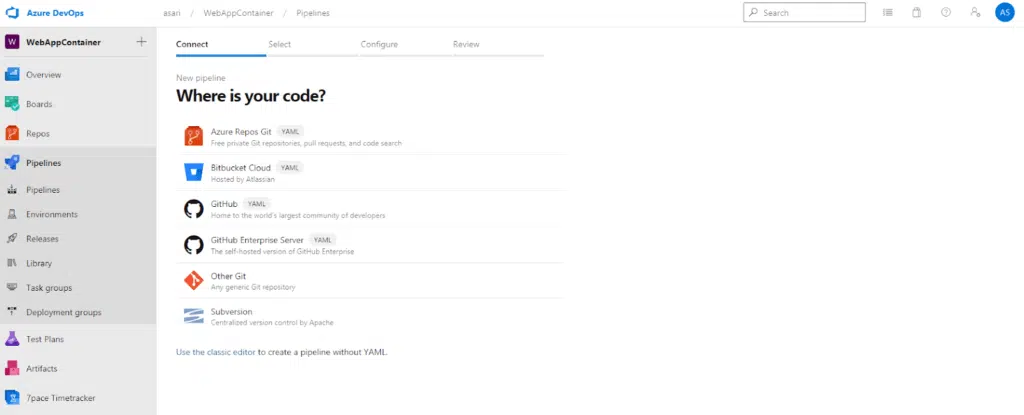
IT wants us to show us where our code is. If we choose one of the above options here, we set up a pipeline in YAML format, if we say classic editor as in the article below, we can build a more visualized pipeline. My advice will be editing in YAML format because the yaml file is committed to the git branch and can be versioned in the repository file in developers regardless of the environment. We continue by choosing our repository. In the next step, it asks which application type to build.
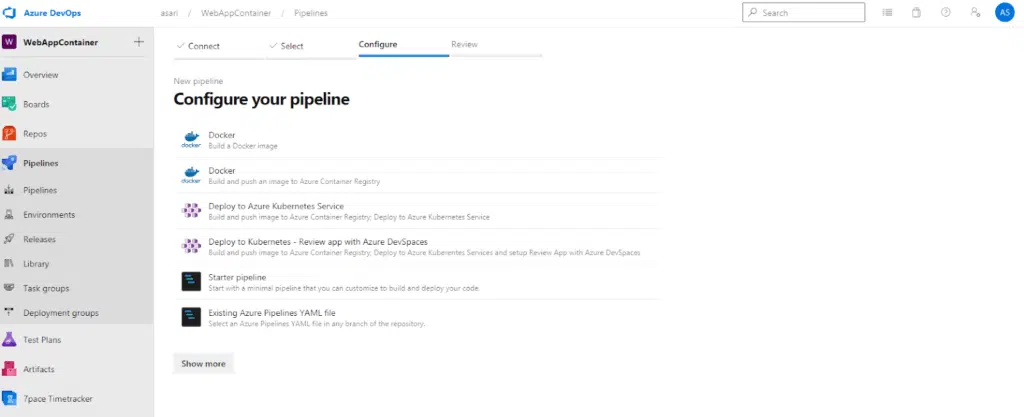
Since it is dockerfile in our files, it has put Docer at the top as suggested. We can continue with the pipeline models that we encounter here by choosing a template and an empty template. However, if we choose Docker, steps will be added automatically to build Docker image.

The yaml of our CI pipeline is formed as follows.
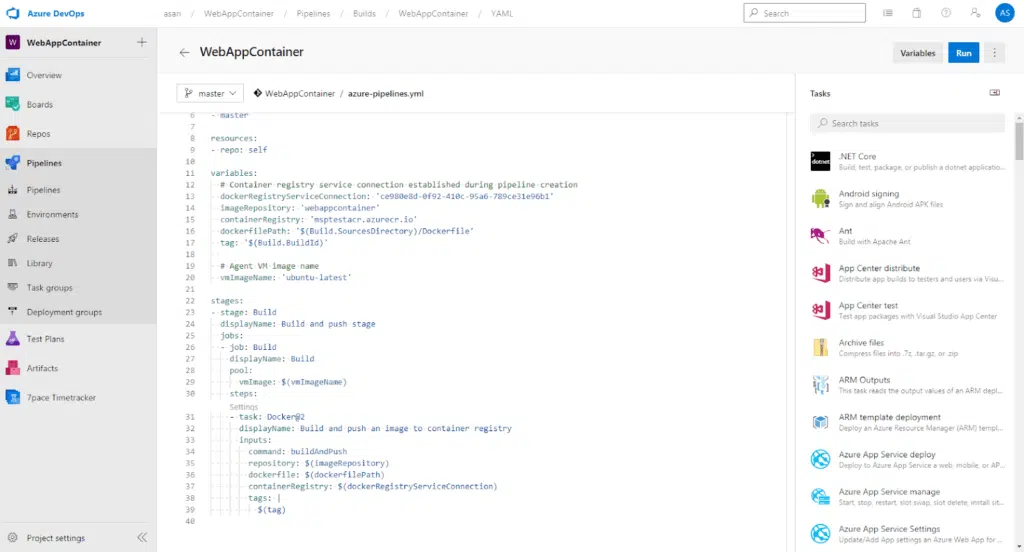
This pipeline now consists of a few steps and is doing Docker build and push to ACR. When we run it, we get an output like the one below.
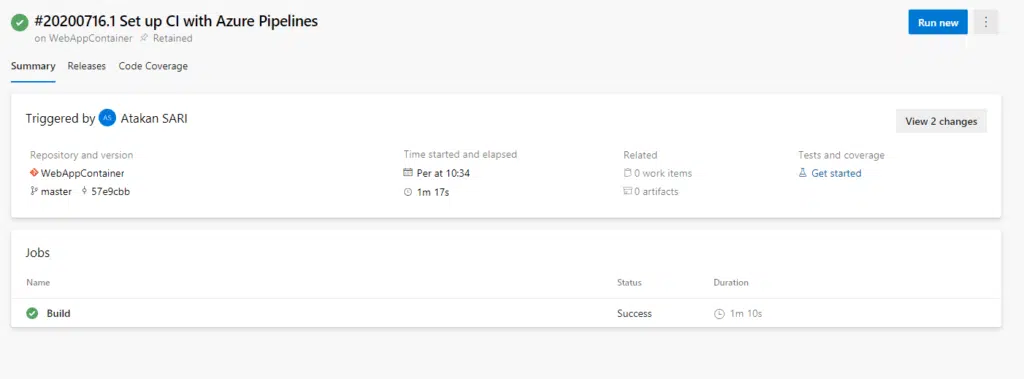
Our pipeline has been completed in 1 minute 10 seconds and our new image has been pushed to Container Registry. In this way, every time the developer commits his code to the master, he will get an application in the new version.

Previous Post

Microsoft 365 Güvenliği ve Uzaktan Çalışma Teknoloji Sohbeti

Next Post

Microsoft Azure App Service Slots

Azure Devops Nedir?

Azure DevOps sadece bir tool değil aynı zamanda kültürel ve profesyonel bir harekettir. Benim görüşüme göre ise Devops, yazılım ekipleri ile IT ekipleri arasındaki otomasyonu, iletişimi ve entegrasyonu sağlayan pratiklerdir.

Azure DevOps bu yaklaşımda karşımıza 5 adet ana modül ile çıkıyor. Bunlar ; Boads, Repos, Pipelines, Tests ve Artifacts. Aslında bu modüllerin hiçbiri daha önce yapmadığımız işler değil ve yeni bir teknoloji değil ancak Azure DevOps’un burada katma değeri bütün proje bileşenlerini tek bir portalden yönetebiliyor olmamız. Proje ile alakalı bütün geliştirme adımları, kanban board, kod repository, otomatik CI/CD süreçleri, test adımları ve nuget paketleri tek bir portal üzerinden yönetilebiliyor.

Azure Devops Bileşenleri

Azure Boards 5 adet ana bileşenden oluşur :  

1. Azure Boards sayesinde projemizin tüm efor ve adımlarını takip edebiliyoruz. Klasik Agile, Scrum yöntemlerini izleyebilir veya isteklerimize göre özelleştirebiliriz.

2. Azure Repos : Repos sayesinde ekibimizin knowledge base’ini yada kodlarımızı projemizle aynı ortamda tutabiliyoruz. İstersek Git özelliği ile istersek VSTS özelliği ile paket halinde uygulamamızı barındırabiliyoruz.

3. Azure Pipelines : Pipelines Azure DevOps’un belkide en önemli özelliği diyebiliriz. Bu modül ile birlikte CI/CD süreçlerimizi kurgulayabilir, onay mekanizmaları kurabilir veya otomatik bir şekilde çalışan scriptler çalıştırabiliriz.

4. Azure Tests Plans : Test modülü sayesinde uygulamamızda test adımları kurgulayabilir. Bunları açılan bir browserden deneyebilir, anında bug tespiti yapabilir ve bu buglara istinaden work Itemlar oluşturabiliyoruz.

5. Azure Artifacts : Arfitacs modülü sayesinde uygulamamızın kullandığı bağımlılık paketlerinin dağıtımını yapabiliyoruz. Uygulama derlendikten sonra en güncel versionun kullandığı bağımlılıklar paketlenerek nuget veya diğer paket yönetim dillerinde dağıtım yapılıyor.

Devops Yaşam Döngüsü

Azure DevOps ile bir proje geliştirmek istersek bu projenin yaşam döngüsü yukarıdaki gibi olacaktır. Bu görseli anlatmak gerekirse 

  1. Consultants&Developers : Uygulamayı yada projenin geliştirmesi yapılır Repository’e pushlanır
  2. Code Repository : Geliştiriciler tarafından gönderilen kaynak kodlar versionlanır ve branch yapısında tutulur. Geliştirme uygun bulunursa master branch’ine pull request yapılır.
  3. Commit-Build : Uygulama Pull Request olduktan sonra Build işlemi gerçekleştirilir ve çalıştırılabilir paket hale getirilir.
  4. Test : Çalıştırılabilir paket deploy edilmeden önce otomatize testler yapılır. Bu testlerin hepsi başarıyla sonuçlanırsa bir sonraki adıma geçilir 
  5. Deploy to Cloud : Çalıştırılabilir pakedimiz production ortamına belirlenen deployment modeliyle birlikte yüklenir ve yeni versionumuz canlıya geçmiş olur
  6. Monitor and Improve : Production ortamı izlenir ve iş ihtiyaçlarına göre süreç başa dönerek ilgili geliştirmeler yapılır.

Yukarıda ki yaşam döngüsü DevOps’un sürekli tekrar eden yaşam döngüsünü çok yüzeysel bir şekilde göstersede her firmanın kendi ortamına göre her aşamada farklı ekip veya farklı birimlerin rol alması söz konusu olabiliyor. Hatta aynı firma içerinde aynı süreci farklı toollarla ve ekiplerle yapmak bile çoğu zaman söz konusu olabiliyor. Ama değişmeyen tek şey her sürecin birbiri ardına otomatize bir şekilde çalışması ve yaşam döngüsünün kişilerden bağımsız sistematik bir şekilde olmasıdır.

Azure Devops Örneği

Azure DevOps servisini şirket içinde veya bireysel olarak kurgulamak istersek. dev.azure.com’a giriş yapmamızve bir proje oluşturmamız yeterli olacaktır. Bu servisin en öne çıkan yanlarından birisi ise aynı proje içerisinde 5 kullanıcıya kadar tüm özelliklerin ücretsiz olması ve daha sonrasında ise yine ücretsiz kalıp kısıtlı bir erişim sunmasıdır. Aşağıdaki görselde benim devops ortamımdaki projelerin bazıları gözükmekte. 

WebApp Container isimli projemize giriyoruz ve karşımıza bir hoşgeldin ekranı çıkıyor. Burada projemiz hakkında genel bilgiler ve wiki diyebileceğimiz bir alan bulunuyor. 

Ayrıca sol tarafta Artifacts’ın altında bir modül daha görüyorsunuz. Azure DevOps’un marketplace’inden ihtiyaçlarınıza yönelik olarak extensionlar projenize dahil edebiliyorsunuz. Yeni bir pipeline kurgulanması örneği yapacağız. Bunun için repository’mize öncelikle kodları publish ediyoruz. İstersek kodu burada değil herhangi bir git dağtımında da tutabilirdik.

Kodlarımız Repositoryimizde bulunduğuna göre öncelikle her kod gönderiminde çalışacak olan CI pipeline’ını kurguluyoruz. Bunun içini Pipelines modülünden New Pipeline butonuna basıyoruz.

Bize kodumuzun yerini göstermemizi istiyor. Burda yukardaki seçeneklerden birini seçersek YAML formatında bir pipeline kurguluyoruz, eğer aşağıdaki yazıdaki gibi classic editor dersek ise daha görselleştirilmiş bir pipeline kurgulayabiliyoruz. Benim tavsiyem YAML formatında kurgulanması olacak çünkü yaml dosyası git branch’ine commit ediliyor ve ortamdan bağımsız olarak pipeline dosyasıda geliştiriclerde versionlanabiliyor. Repositoryimizi seçerek devam ediyoruz. Bir sonraki adımda hangi uygulama tipinde bir build alınacağını soruyor.

Dosyalarımızın içinde dockerfile olduğu için Docer’ı önerilen olarak en üstte çıkartmış durumda. Burada karşımıza çıkan pipeline modelleri aslında bir template ve boş bir template seçerekte devam edebiliriz. Ancak Docker’ı seçersek eğer Docker image’ı build etmesi için otomatik olarak adımlar eklenmiş olacak.

CI pipeline’ımızın yaml’ı aşağıdaki gibi oluşmuş oluyor.

Bu pipeline şuanda birkaç adımdan oluşup Docker build’i ve ACR’a pushlamasını gerçekleştiriyor. Çalıştırdığımız zaman ise aşağıdaki gibi bir çıktı elde ediyoruz. 

1 dakika 10 saniyede pipeline’ımız tamamlanmış durumda ve yeni image’imiz Container Registry’e pushlanmış oldu. Bu sayede geliştirici kodunu her master’a commitlediğinde yeni versionda bir uygulama elde etmiş olacak.

Previous Post

Microsoft Azure App Service Slots

Next Post

Azure Functions ile back-end API’lar Geliştirmek

Start typing to see you are looking for.